Unlock the Magic of Easy One-Pot Chili Con Carne: A Next-Day Feast
Imagine a dish that’s rich, hearty, and deeply satisfying, requiring minimal cleanup, and tasting even better the day after it’s made. This isn’t a culinary fantasy; it’s the reality of a perfectly crafted classic chili con carne. Originating from the American Southwest, this iconic stew transcends mere sustenance, offering a warming embrace that’s perfect for busy weeknights, lively game-day gatherings, or whenever you crave authentic comfort food. Our easy one-pot recipe celebrates the bold flavors of tradition while streamlining the cooking process, ensuring you get maximum flavor with minimum fuss. And the best part? Its ability to transform overnight into an even more delectable experience makes it the ultimate meal-prep champion.The Enduring Appeal of Classic Chili Con Carne
At its heart, classic chili con carne is a celebration of simple ingredients coming together to create something extraordinary. Meaning "chili with meat," this thick, savory stew is typically built upon a foundation of browned ground beef, tender beans, robust tomatoes, and a symphony of warming spices. But its appeal goes far beyond its ingredients. Historically rooted in Texas and the American Southwest, chili con carne evolved as a staple for pioneers and cowboys – a budget-friendly, high-protein meal that could feed a crowd and stand up to the rigors of travel. Today, its legacy continues, making it a beloved choice for families and friends across the globe. What truly elevates our one-pot approach to classic chili con carne is its sheer convenience. From sautéing aromatics to simmering the sauce, every step happens in a single pot. This not only minimizes washing up – a blessing on any busy day – but also allows the flavors to meld seamlessly from start to finish. It’s a truly versatile dish that promises comfort and satisfaction, whether served as a robust main course or as a flavorful topping.Why This One-Pot Recipe Becomes Even Better Overnight
The secret to a truly outstanding classic chili con carne isn't just in the cooking process; it's often in the waiting. While delicious straight from the pot, this dish undeniably reaches new heights of flavor when enjoyed the next day. This phenomenon, often referred to as "next-day magic," is a culinary secret every home cook should embrace, especially for stews and braises. So, why does chili taste better after a night in the fridge?- Flavor Melding and Deeper Infusion: As the chili cools and rests, the various components – the spices, tomatoes, beef, and beans – have more time to fully intermingle and exchange flavors. The spices, which might seem distinct immediately after cooking, soften and blend into a more harmonious and complex profile.
- Rehydration and Absorption: The beans and meat continue to absorb the flavorful liquids, becoming even more tender and infused with the rich broth. This process also helps to balance the chili's texture.
- Collagen Breakdown: For dishes with meat, the collagen present in the muscle fibers continues to break down over time, even after cooking, leading to a more succulent and melt-in-your-mouth texture the next day.
- Concentration: As the chili cools, any excess moisture evaporates slightly, leading to a more concentrated flavor profile.
Crafting Your Perfect Classic Chili Con Carne: Ingredients & Steps
Creating a truly memorable classic chili con carne begins with selecting the right ingredients and following a simple, yet effective, cooking method. Our one-pot recipe is designed for maximum flavor and minimal fuss.The Foundation: Quality Ingredients Make the Difference
While chili is often seen as a humble dish, the quality of your core ingredients will significantly impact the final taste. Here’s what you’ll need to create a batch that serves 10-12 people:
- 2 tablespoons olive oil: The starting point for sautéing.
- 2 large onions, diced: Essential aromatics that build the flavor base.
- 5 cloves garlic, minced: Another critical aromatic for depth.
- 3 pounds ground beef (chuck recommended): Chuck beef, with its slightly higher fat content, renders down beautifully, adding richness and depth of flavor to your chili.
- 2 tablespoons tomato paste: A concentrated burst of umami that deepens the tomato flavor.
- 1 (12-ounce) can crushed tomatoes: Provides the foundational tang and body to the sauce.
- 3 cups beef broth: The liquid base that melds all the flavors.
- 3 tablespoons chili powder: This is a key spice blend (typically a mix of ground chili pepper, paprika, garlic, and cumin in the US) that defines the chili's character.
- 1 tablespoon ground cumin: Earthy and warm, a must-have for classic chili.
- 1 teaspoon smoked paprika: Adds a beautiful smoky depth that complements the beef.
- ½ teaspoon dried oregano: A Mediterranean herb that surprisingly works wonders in Southwest flavors.
- ½ teaspoon cayenne pepper (adjust to taste): For that gentle warmth, easily customizable.
- 2 (15-ounce) cans kidney beans, drained and rinsed: Adds texture, protein, and makes the chili heartier.
- 1 (15-ounce) can pinto beans, drained and rinsed: Another classic chili bean, contributing to the creamy texture.
- Salt and black pepper, to taste: Crucial for balancing and enhancing all other flavors.
Step-by-Step Simplicity for Maximum Flavor
- Sauté Aromatics: In a large, heavy-bottomed pot or Dutch oven, heat the olive oil over medium-high heat. Add the diced onions and cook until they soften and become translucent, about 5 minutes. Stir in the minced garlic and cook for just 1 minute more until fragrant, being careful not to burn it.
- Brown the Beef: Add the ground beef to the pot, breaking it up with a spoon. Cook until it’s fully browned, ensuring no pink remains. This step is crucial for developing rich, savory flavors. If there’s a significant amount of excess grease, drain it off to prevent a greasy chili.
- Build the Base: Stir in the tomato paste, crushed tomatoes, and beef broth. Mix thoroughly, scraping up any browned bits from the bottom of the pot, which are packed with flavor. Bring the mixture to a gentle simmer.
- Infuse with Spices: Add the chili powder, ground cumin, smoked paprika, dried oregano, cayenne pepper, salt, and black pepper. Stir well to evenly distribute the spices throughout the meat and sauce. This "blooming" of spices in the hot liquid helps to release their full aromatic potential.
- Low and Slow Simmer: Reduce the heat to low, cover the pot loosely or leave it uncovered (depending on desired thickness), and let it simmer for at least 60 minutes, stirring occasionally. This long simmer allows the flavors to deepen and meld beautifully. If the chili becomes too thick, you can add a little more beef broth.
- Add the Beans: Stir in the drained and rinsed kidney beans and pinto beans. Continue to simmer for an additional 30 minutes. This allows the beans to absorb the rich flavors of the chili without becoming mushy from overcooking.
- Final Touches: Taste your chili and adjust the seasoning as needed. You might want a little more salt, pepper, or a pinch more cayenne for extra heat. Serve hot with your favorite toppings!
Beyond the Bowl: Serving Suggestions and Customization
A delicious batch of classic chili con carne is incredibly versatile, offering endless possibilities for serving and customization. Whether you prefer a traditional approach or love to get creative, this dish adapts beautifully.Classic Pairings & Creative Twists
While a bowl of chili on its own is perfectly satisfying, these additions elevate the experience:
- Traditional Sides: Serve with warm, buttery cornbread, fluffy steamed rice, or crunchy tortilla chips for dipping.
- Hearty Bases: Spoon it generously over baked potatoes, hot dogs (for a chili dog experience), or even French fries for a decadent twist.
- Fresh Balance: Pair your rich chili with a crisp green salad tossed with a light vinaigrette to cut through the richness.
- Chili Bowls: Use it as a filling for tacos, burritos, or quesadillas for a fun, customizable meal.
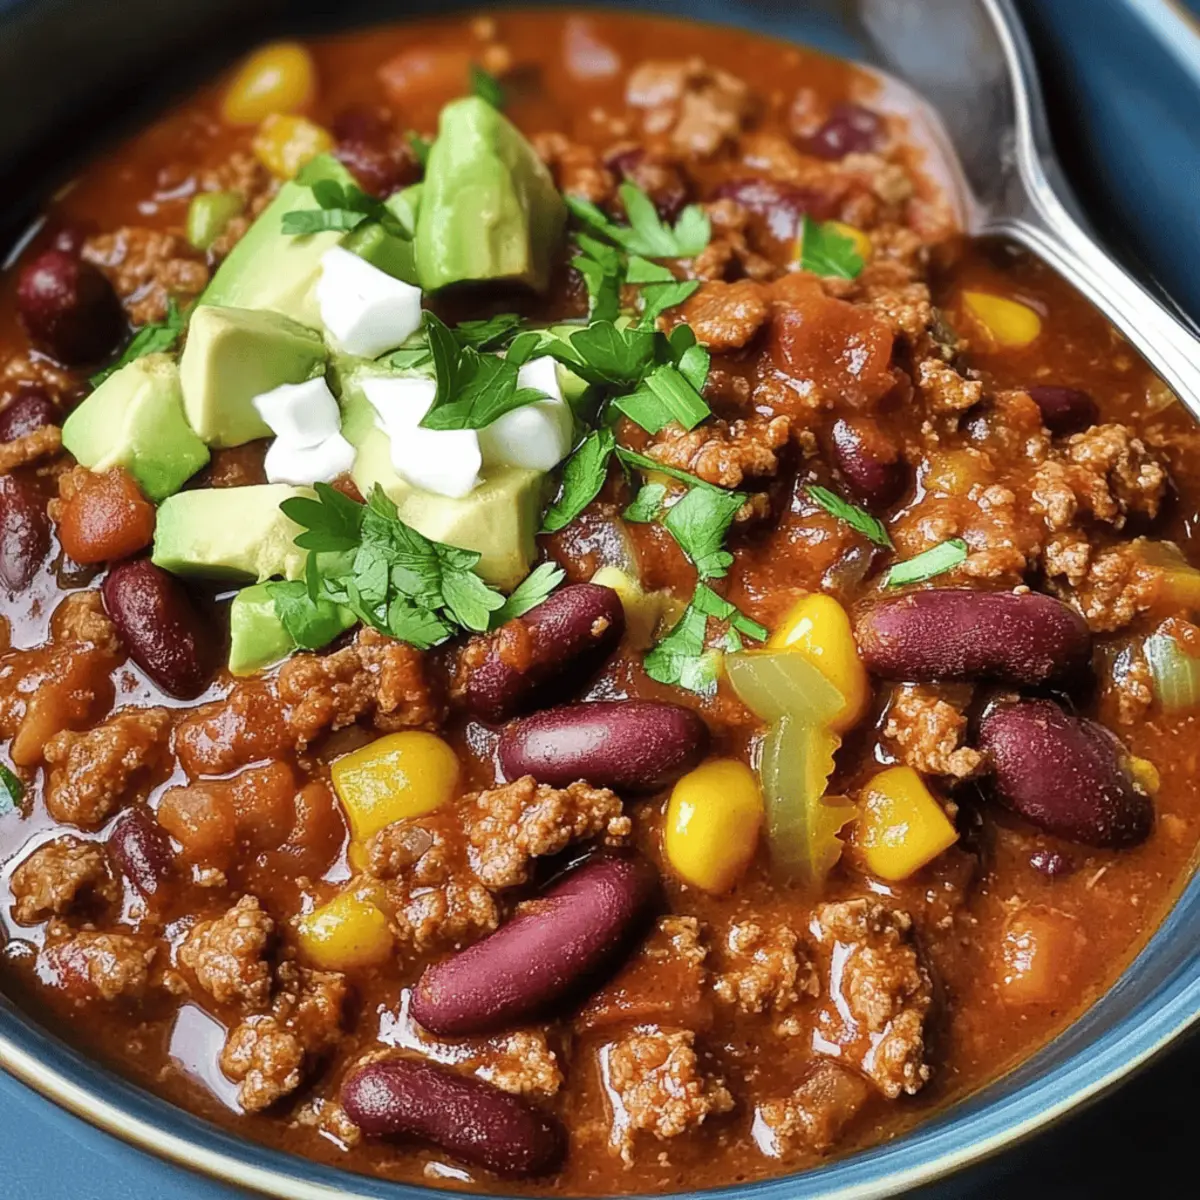
Don't forget the toppings! These elevate the presentation and add an extra layer of flavor and texture:
- Shredded sharp cheddar cheese (a classic!)
- Cool sour cream or a dollop of Greek yogurt
- Freshly chopped green onions or chives
- Bright, fresh cilantro
- Diced avocado or a spoonful of guacamole
- A squeeze of fresh lime juice for a zingy finish
Make It Your Own: Variations & Pro Tips
One of the beauties of classic chili con carne is how easily it can be adapted to suit different preferences:
- Turn up the Heat: For a spicier kick, increase the cayenne pepper, add a diced jalapeño or serrano pepper along with the onions, or stir in a teaspoon of chipotle chili powder for smoky heat.
- Chunky Chili: If you prefer a meatier texture, replace half or all of the ground beef with cubed beef chuck (cut into ½-inch pieces). You'll need to brown the cubes thoroughly before adding other ingredients and might increase the simmer time to ensure they become fork-tender.
- Vegetarian Adaptation: To make it plant-based, omit the beef and use vegetable broth. Increase the amount of beans (e.g., add black beans, chickpeas) or incorporate plant-based ground protein crumbles.
- Freezer-Friendly: This chili is a superstar for freezing! Once completely cooled, portion it into airtight containers or heavy-duty freezer bags. It will keep beautifully for up to 3 months. Thaw overnight in the refrigerator and reheat gently on the stove or in the microwave.
- The One-Pot Advantage: Remember, the beauty of this recipe is its one-pot nature. This means less cleanup and more time to enjoy your delicious creation!
